How do I use metal in SwiftUI animations?
Asked on 2024-08-02
1 search

To use Metal in SwiftUI animations, you can leverage SwiftUI shaders, which are small programs that calculate various rendering effects directly on your device's GPU. These shaders are written in the Metal shading language. Here's a step-by-step guide based on the information from the WWDC sessions:
-
Create a Shader Function in Metal:
- Write a shader function in a
.metalfile. This function will define the visual effect you want to achieve. For example, you might create a ripple effect that distorts the view based on touch input. - Example Metal shader function:
kernel void ripple(texture2d<float, access::read> inTexture [[texture(0)]],
                   texture2d<float, access::write> outTexture [[texture(1)]],
                   constant float2 &touchPosition [[buffer(0)]],
                   constant float &time [[buffer(1)]],
                   uint2 gid [[thread_position_in_grid]]) {
    // Calculate the ripple effect based on touch position and time
    float2 uv = float2(gid) / float2(outTexture.get_width(), outTexture.get_height());
    float dist = distance(uv, touchPosition);
    float ripple = sin(dist * 10.0 - time * 5.0) * 0.1;
    float2 newUV = uv + ripple;
    outTexture.write(inTexture.sample(sampler(), newUV), gid);
}
- Write a shader function in a
-
Instantiate the Shader in SwiftUI:
- Use the
ShaderLibraryto load your shader function and apply it to a view using thelayerEffectview modifier. - Example SwiftUI code:
struct RippleEffect: ViewModifier {
    var touchPosition: CGPoint
    var time: Float

    func body(content: Content) -> some View {
        content
            .layerEffect(ShaderLibrary.ripple(touchPosition: touchPosition, time: time))
    }
}

struct ContentView: View {
    @State private var touchPosition: CGPoint = .zero
    @State private var time: Float = 0.0

    var body: some View {
        Rectangle()
            .fill(Color.blue)
            .modifier(RippleEffect(touchPosition: touchPosition, time: time))
            .onTapGesture { location in
                touchPosition = location
                time = 0.0
            }
            .onAppear {
                withAnimation(.linear(duration: 2.0).repeatForever(autoreverses: false)) {
                    time = 2.0
                }
            }
    }
}
- Use the
-
Apply the Shader to a View:
- Use the
layerEffectview modifier to apply the shader to your SwiftUI view. This will call your shader function for every pixel of the view, running the shader on the GPU for real-time performance.
- Use the
For more detailed information, you can refer to the session Create custom visual effects with SwiftUI (19:02) which covers how to implement and use Metal shaders in SwiftUI.
Relevant Sessions
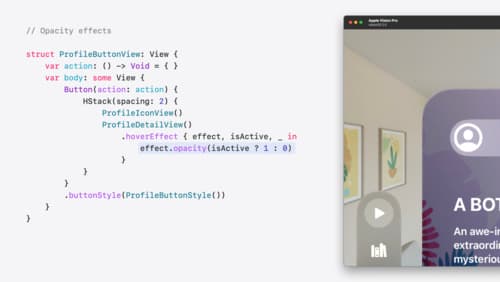
Create custom hover effects in visionOS
Learn how to develop custom hover effects that update views when people look at them. Find out how to build an expanding button effect that combines opacity, scale, and clip effects. Discover best practices for creating effects that are comfortable and respect people’s accessibility needs.
Enhance your UI animations and transitions
Explore how to adopt the zoom transition in navigation and presentations to increase the sense of continuity in your app, and learn how to animate UIKit views with SwiftUI animations to make it easier to build animations that feel continuous.
Bring your iOS or iPadOS game to visionOS
Discover how to transform your iOS or iPadOS game into a uniquely visionOS experience. Increase the immersion (and fun factor!) with a 3D frame or an immersive background. And invite players further into your world by adding depth to the window with stereoscopy or head tracking.