How do I test a view controller?
Asked on 2024-08-03
1 search

To test a view controller in Xcode, you can follow these steps, leveraging the new features introduced in Xcode 16 and Swift Testing:
-
Create a Test Target:
- If your project doesn't already have a test target, you can add one by choosing the appropriate template in Xcode 16. This is covered in the session Meet Swift Testing.
-
Write a Test Function:
- Import the testing module and write a global function with the
@Testattribute. This attribute marks the function as a test, and Xcode will recognize it and show a run button alongside it. This is demonstrated in the session Meet Swift Testing.
- Import the testing module and write a global function with the
-
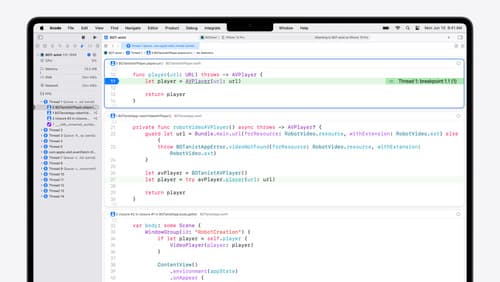
Initialize the View Controller:
- In your test function, initialize the view controller you want to test. You can do this by creating an instance of the view controller and setting up any necessary dependencies or initial state.
-
Perform Actions and Verify Results:
- Perform actions on the view controller and use assertions to verify the expected outcomes. Swift Testing provides the
expectmacro to validate that your code behaves as expected. This is highlighted in the session Go further with Swift Testing.
- Perform actions on the view controller and use assertions to verify the expected outcomes. Swift Testing provides the
-
Use Test Suites and Tags for Organization:
- To avoid unintentional state sharing and to organize your tests, you can use test suites and tags. Each test function is called on a new instance of its containing suite type, ensuring isolation. Tags can help group related tests and run them together. This is discussed in the session Meet Swift Testing and What’s new in Xcode 16.
-
Run and Debug Tests:
- Use the test navigator (Command + 6) to see all your tests, run them, and view the results. You can filter tests by tags or names to focus on specific tests. This is covered in the session Xcode essentials.
For more detailed information, you can refer to the sessions:
These sessions provide comprehensive insights into the new testing features and best practices in Xcode 16.
What’s new in Xcode 16
Discover the latest productivity and performance improvements in Xcode 16. Learn about enhancements to code completion, diagnostics, and Xcode Previews. Find out more about updates in builds and explore improvements in debugging and Instruments.
Go further with Swift Testing
Learn how to write a sweet set of (test) suites using Swift Testing’s baked-in features. Discover how to take the building blocks further and use them to help expand tests to cover more scenarios, organize your tests across different suites, and optimize your tests to run in parallel.
Meet Swift Testing
Introducing Swift Testing: a new package for testing your code using Swift. Explore the building blocks of its powerful new API, discover how it can be applied in common testing workflows, and learn how it relates to XCTest and open source Swift.