build a simple timer app with live activity iOS 16 API
Asked on 2024-07-30
1 search

To build a simple timer app with the Live Activity API in iOS 16, you can follow these steps:
-
Create a New Project: Start by creating a new iOS project in Xcode.
-
Add Live Activity Capability: Ensure your app has the necessary capabilities for Live Activities. You can do this by enabling the "Live Activities" capability in your app's target settings.
-
Define the Live Activity: Create a new Swift file for your Live Activity. Define the structure of your Live Activity using SwiftUI. For example, you can create a simple timer view that updates every second.
-
Update the Live Activity: Use the
ActivityAPI to start and update your Live Activity. You can use a timer to periodically update the Live Activity with the remaining time. -
Customize for Apple Watch: If you want your Live Activity to also appear on Apple Watch, you can customize it using the
small supplemental activity family. This will ensure that your Live Activity looks great on both iOS and watchOS.
Here is a basic example of how you might implement this:
import SwiftUI
import ActivityKit

struct TimerActivityAttributes: ActivityAttributes {
    public struct ContentState: Codable, Hashable {
        var remainingTime: TimeInterval
    }

    var name: String
}

struct TimerActivityView: View {
    let context: ActivityViewContext<TimerActivityAttributes>

    var body: some View {
        VStack {
            Text("Timer: \(context.state.remainingTime, specifier: "%.0f") seconds")
                .font(.headline)
        }
        .padding()
    }
}

@main
struct TimerApp: App {
    var body: some Scene {
        WindowGroup {
            ContentView()
        }
    }
}

struct ContentView: View {
    @State private var activity: Activity<TimerActivityAttributes>?

    var body: some View {
        VStack {
            Button("Start Timer") {
                startTimer()
            }
        }
        .padding()
    }

    func startTimer() {
        let attributes = TimerActivityAttributes(name: "Simple Timer")
        let initialContentState = TimerActivityAttributes.ContentState(remainingTime: 60)

        do {
            activity = try Activity<TimerActivityAttributes>.request(
                attributes: attributes,
                contentState: initialContentState,
                pushType: nil
            )

            Timer.scheduledTimer(withTimeInterval: 1.0, repeats: true) { timer in
                guard let activity = activity else {
                    timer.invalidate()
                    return
                }

                var newState = activity.contentState
                newState.remainingTime -= 1

                Task {
                    await activity.update(using: newState)
                }

                if newState.remainingTime <= 0 {
                    timer.invalidate()
                    Task {
                        await activity.end(dismissalPolicy: .immediate)
                    }
                }
            }
        } catch {
            print("Failed to start activity: \(error)")
        }
    }
}
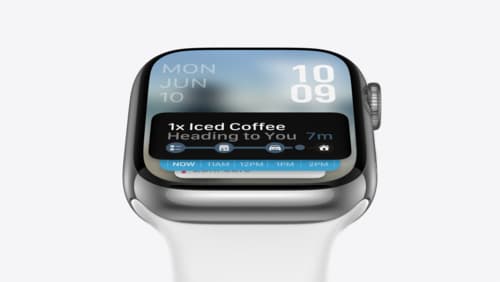
Customizing for Apple Watch
To customize your Live Activity for Apple Watch, you can follow the guidance from the session Bring your Live Activity to Apple Watch. This session explains how to use the small supplemental activity family to tailor the content for watchOS.
For more detailed information, you can also refer to the session Design Live Activities for Apple Watch, which provides guidelines and best practices for designing Live Activities on Apple Watch.
Relevant Sessions
- Bring your Live Activity to Apple Watch
- Design Live Activities for Apple Watch
- What’s new in watchOS 11
These sessions will provide you with a comprehensive understanding of how to implement and customize Live Activities for both iOS and watchOS.
Design Live Activities for Apple Watch
Starting in watchOS 11, Live Activities from your iOS app will automatically appear in the Smart Stack on a connected Apple Watch. Learn how to optimize the layout of your Live Activity for the wrist, and provide the right level of information and interactivity at the right time.

Platforms State of the Union
Discover the newest advancements on Apple platforms.
What’s new in SwiftUI
Learn how you can use SwiftUI to build great apps for any Apple platform. Explore a fresh new look and feel for tabs and documents on iPadOS. Improve your window management with new windowing APIs, and gain more control over immersive spaces and volumes in your visionOS apps. We’ll also take you through other exciting refinements that help you make expressive charts, customize and layout text, and so much more.