How do I unit test a SwiftUI view?
Asked on 2024-08-03
1 search

To unit test a SwiftUI view, you can leverage the new Swift Testing framework introduced in Xcode 16. Here are the steps to get started:
-
Create a Test Target: If you don't already have a test target, you can create one in Xcode by going to
File > New > Targetand selecting a test target. -
Import the Testing Framework: In your test file, import the necessary testing framework.
-
Write a Test Function: Define a test function and use the
@Testattribute to mark it as a test. This will make Xcode recognize it as a test and display a run button alongside it. -
Initialize the View: Create an instance of the SwiftUI view you want to test.
-
Use Expectations: Use the
expectmacro to verify the results. This allows you to write complex checks on your view's state or output.
Here is an example of how you might write a test for a SwiftUI view:
import SwiftUI
import XCTest
import Testing

struct MyView: View {
    var body: some View {
        Text("Hello, World!")
    }
}

@Test
func testMyView() {
    // Initialize the view
    let view = MyView()

    // Use an expectation to verify the view's output
    expect(view.body) { body in
        // Check that the body contains a Text view with the correct string
        if let text = body as? Text {
            XCTAssertEqual(text.string, "Hello, World!")
        } else {
            XCTFail("Expected a Text view")
        }
    }
}
Relevant Sessions
- Meet Swift Testing (00:00:59)
- What’s new in Xcode 16 (00:12:55)
- What’s new in Swift (00:13:06)
These sessions provide detailed information on the new Swift Testing framework and how to use it effectively in your projects.

Platforms State of the Union
Discover the newest advancements on Apple platforms.
Meet Swift Testing
Introducing Swift Testing: a new package for testing your code using Swift. Explore the building blocks of its powerful new API, discover how it can be applied in common testing workflows, and learn how it relates to XCTest and open source Swift.
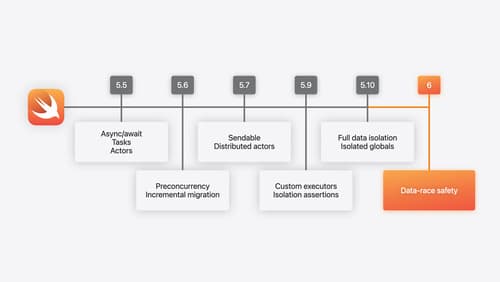
What’s new in Swift
Join us for an update on Swift. We’ll briefly go through a history of Swift over the past decade, and show you how the community has grown through workgroups, expanded the package ecosystem, and increased platform support. We’ll introduce you to a new language mode that achieves data-race safety by default, and a language subset that lets you run Swift on highly constrained systems. We’ll also explore some language updates including noncopyable types, typed throws, and improved C++ interoperability.