how to use a picker in swiftui
Asked on 2024-08-05
1 search

To use a picker in SwiftUI, you can follow these steps:
-
Define the Picker: Use the
Pickerview to create a picker. You need to provide a selection binding and a label for the picker. -
Provide Options: Use a
ForEachloop to provide the options for the picker. -
Handle Selection: Bind the picker to a state variable to handle the selection.
Here is a basic example:
import SwiftUI

struct ContentView: View {
    @State private var selectedOption = 0
    let options = ["Option 1", "Option 2", "Option 3"]

    var body: some View {
        VStack {
            Picker("Select an option", selection: $selectedOption) {
                ForEach(0..<options.count) { index in
                    Text(self.options[index]).tag(index)
                }
            }
            .pickerStyle(SegmentedPickerStyle()) // You can choose different styles
            .padding()

            Text("Selected option: \(options[selectedOption])")
        }
    }
}
Additional Context from WWDC Sessions
-
SwiftUI Essentials: This session covers various built-in capabilities of SwiftUI, including controls like
Picker. You can explore more about SwiftUI's declarative and adaptive views in this session. SwiftUI essentials. -
What’s new in StoreKit and In-App Purchase: This session introduces a new subscription picker API, which might be useful if you are dealing with subscription options in your app. What’s new in StoreKit and In-App Purchase.
-
Squeeze the most out of Apple Pencil: This session discusses the
PKToolPicker, which is a specialized picker for tools in PencilKit. It provides insights into customizing tool pickers for drawing apps. Squeeze the most out of Apple Pencil.
For more detailed information, you can refer to the respective sessions and their documentation.
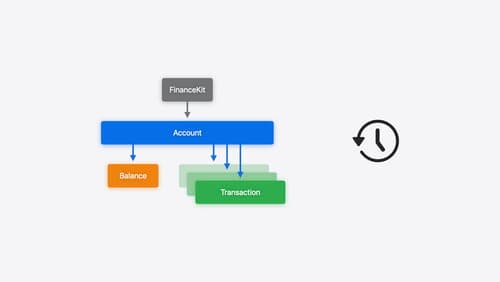
Meet FinanceKit
Learn how FinanceKit lets your financial management apps seamlessly and securely share on-device data from Apple Cash, Apple Card, and more, with user consent and control. Find out how to request one-time and ongoing access to accounts, transactions, and balances — and how to build great experiences for iOS and iPadOS.
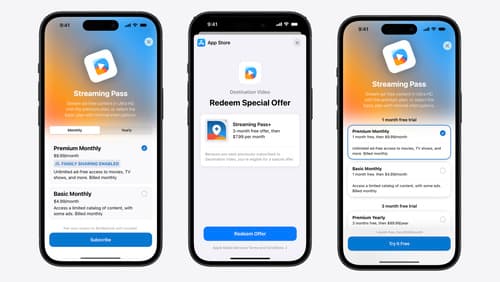
What’s new in StoreKit and In-App Purchase
Learn how to build and deliver even better purchase experiences using the App Store In-App Purchase system. We’ll demo new StoreKit views control styles and new APIs to improve your subscription customization, discuss new fields for transaction-level information, and explore new testability in Xcode. We’ll also review an important StoreKit deprecation.

Meet AccessorySetupKit
Elevate your accessory setup experience with AccessorySetupKit. Display a beautiful pairing dialog with an image of your Bluetooth or Wi-Fi accessory — no trip to the Settings app required. Discover how to improve privacy by pairing only your app with an accessory. And learn how you can migrate existing accessories so they can be managed by AccessorySetupKit.