how do I add location tracking to my app
Asked on 2024-08-05
1 search

To add location tracking to your app, you can use the CoreLocation framework provided by Apple. Here are the steps to get started, based on the information from the WWDC sessions:
-
Request Authorization:
- Before you can use location services, you need to request authorization from the user. This can be done using the
CLLocationManagerand methods likerequestWhenInUseAuthorizationorrequestAlwaysAuthorization. - In the session What’s new in location authorization, it is mentioned that you can simplify this process using the new
CLServiceSessionfor a more declarative approach.
- Before you can use location services, you need to request authorization from the user. This can be done using the
-
Set Up Location Manager:
- Create an instance of
CLLocationManagerand set its delegate. - Configure the desired accuracy and distance filter.
- Create an instance of
-
Handle Authorization Status:
- Implement the delegate methods to handle changes in authorization status and to start receiving location updates.
-
Start Receiving Location Updates:
- Once authorized, you can start receiving location updates by calling
startUpdatingLocationon yourCLLocationManagerinstance.
- Once authorized, you can start receiving location updates by calling
Here is a basic example in Swift:
import CoreLocation

class LocationManager: NSObject, CLLocationManagerDelegate {
    private let locationManager = CLLocationManager()

    override init() {
        super.init()
        locationManager.delegate = self
        locationManager.desiredAccuracy = kCLLocationAccuracyBest
        locationManager.requestWhenInUseAuthorization()
    }

    func startTracking() {
        if CLLocationManager.locationServicesEnabled() {
            locationManager.startUpdatingLocation()
        }
    }

    func locationManager(_ manager: CLLocationManager, didChangeAuthorization status: CLAuthorizationStatus) {
        switch status {
        case .authorizedWhenInUse, .authorizedAlways:
            startTracking()
        case .denied, .restricted:
            // Handle denied or restricted status
            break
        case .notDetermined:
            // Request authorization
            locationManager.requestWhenInUseAuthorization()
        @unknown default:
            break
        }
    }

    func locationManager(_ manager: CLLocationManager, didUpdateLocations locations: [CLLocation]) {
        guard let location = locations.last else { return }
        // Use the location data
        print("Location: \(location.coordinate.latitude), \(location.coordinate.longitude)")
    }
}
For more advanced usage and to understand the lifecycle of location sessions, you can refer to the session What’s new in location authorization.
Relevant Sessions:
These sessions provide detailed insights into setting up location tracking and handling user permissions effectively.

Explore object tracking for visionOS
Find out how you can use object tracking to turn real-world objects into virtual anchors in your visionOS app. Learn how you can build spatial experiences with object tracking from start to finish. Find out how to create a reference object using machine learning in Create ML and attach content relative to your target object in Reality Composer Pro, RealityKit or ARKit APIs.
Build a spatial drawing app with RealityKit
Harness the power of RealityKit through the process of building a spatial drawing app. As you create an eye-catching spatial experience that integrates RealityKit with ARKit and SwiftUI, you’ll explore how resources work in RealityKit and how to use features like low-level mesh and texture APIs to achieve fast updates of the users’ brush strokes.
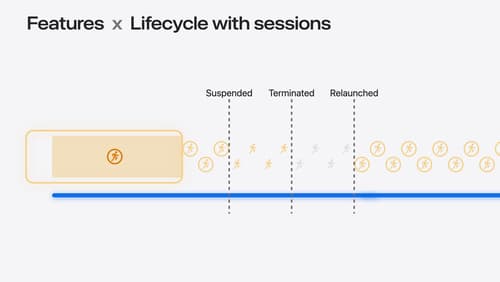
What’s new in location authorization
Location authorization is turning 2.0. Learn about new recommendations and techniques to get the authorization you need, and a new system of diagnostics that can let you know when an authorization goal can’t be met.