how do i do a coredata migration?
Asked on 2024-08-05
1 search

To perform a Core Data migration, you can leverage the new features introduced in SwiftData. Here are the steps and relevant information from the WWDC sessions:
-
Adopt SwiftData: SwiftData provides a framework that simplifies building your app's model layer and persisting it across launches. It includes features for modeling, migration, schema management, and more. You can start by importing the SwiftData framework and decorating your models with the
@Modelmacro.- What’s new in SwiftData (00:01:01)
-
Customize the Model Container: You can tailor the model container to fine-tune its data location and usage throughout the app. This includes customizing the URL of the data on disk, enabling/disabling autosave, and more.
- What’s new in SwiftData (00:04:29)
-
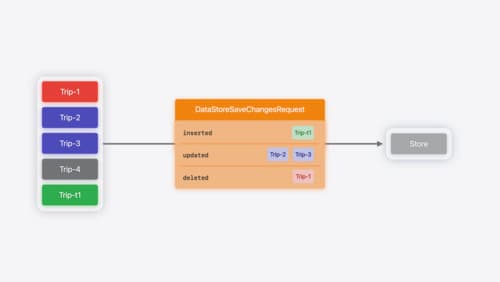
Use the History API: SwiftData history provides a way to track changes in your data over time. This is useful for migrations as it allows you to know what models have been inserted, updated, or deleted. The history API records transactions containing metadata about all changes, which can be queried and processed.
- Track model changes with SwiftData history (00:02:16)
- What’s new in SwiftData (00:03:34)
-
Create Custom Data Stores: If you need to migrate to a different storage backend, you can create custom data stores. SwiftData allows you to define your own data store implementations, which can support features like migration, history tracking, and CloudKit sync.
- Create a custom data store with SwiftData (00:05:40)
- Platforms State of the Union (00:41:00)
-
Migrate from Core Data to SwiftData: If you are using Core Data and want to migrate to SwiftData, you can benefit from persistent history and migrate to SwiftData history instead. This allows you to track and manage changes efficiently.
- Track model changes with SwiftData history (00:16:20)
By following these steps and utilizing the new features in SwiftData, you can effectively manage and migrate your Core Data models. For more detailed information, you can refer to the specific sessions mentioned above.
Create a custom data store with SwiftData
Combine the power of SwiftData’s expressive, declarative modeling API with your own persistence backend. Learn how to build a custom data store and explore how to progressively add persistence features in your app. To get the most out of this session, watch “Meet SwiftData” and “Model your schema with SwiftData” from WWDC23.

Platforms State of the Union
Discover the newest advancements on Apple platforms.

What’s new in SwiftData
SwiftData makes it easy to add persistence to your app with its expressive, declarative API. Learn about refinements to SwiftData, including compound uniqueness constraints, faster queries with #Index, queries in Xcode previews, and rich predicate expressions. Join us to explore how you can use all of these features to express richer models and improve performance in your app. To discover how to build a custom data store or use the history API in SwiftData, watch “Create a custom data store with SwiftData” and “Track model changes with SwiftData history”.