migrate project to swift 6
Asked on 2024-08-06
1 search

To migrate your project to Swift 6, you can follow a structured process as outlined in the Migrate your app to Swift 6 session. Here are the key steps:
-
Enable Complete Concurrency Checking: This is a per-module setting that leaves your project in Swift 5 mode but enables warnings for all the code that would fail with Swift 6's enforced data isolation. This helps you identify and resolve potential issues before fully migrating.
-
Resolve Warnings: Go through the warnings generated by the compiler and fix the issues. The compiler diagnostics will guide you towards the places that need fixing, acting like a pair programmer pointing out potential bugs in your code.
-
Enable Swift 6 Mode: Once all warnings for a target are resolved, enable Swift 6 mode for that target. This locks in all your changes and prevents any future refactorings from regressing to an unsafe state.
-
Repeat for Each Target: Move on to the next target and repeat the process until all targets in your project are migrated.
-
Whole App Refactoring: Optionally, you might want to go back and do some whole app refactoring to undo some unsafe opt-outs by leveraging the new Swift 6 features.
For more detailed guidance, you can refer to the Migrate your app to Swift 6 session, which provides a step-by-step process and practical examples.
Additionally, the Platforms State of the Union session highlights that the new Swift 6 language mode, which enables compile-time data race safety, is opt-in. You can adopt it module by module and interoperate with dependencies that may or may not have migrated to Swift 6.
For best practices on migration, you can also follow along with the hands-on tutorial in the Migrate your app to Swift 6 session.

Platforms State of the Union
Discover the newest advancements on Apple platforms.
Migrate your app to Swift 6
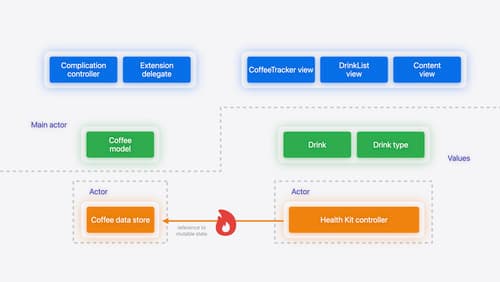
Experience Swift 6 migration in action as we update an existing sample app. Learn how to migrate incrementally, module by module, and how the compiler helps you identify code that’s at risk of data races. Discover different techniques for ensuring clear isolation boundaries and eliminating concurrent access to shared mutable state.
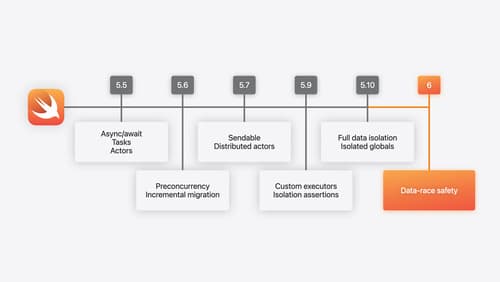
What’s new in Swift
Join us for an update on Swift. We’ll briefly go through a history of Swift over the past decade, and show you how the community has grown through workgroups, expanded the package ecosystem, and increased platform support. We’ll introduce you to a new language mode that achieves data-race safety by default, and a language subset that lets you run Swift on highly constrained systems. We’ll also explore some language updates including noncopyable types, typed throws, and improved C++ interoperability.