How do I design a good iPadOS keyboard input accessory view?
Asked on 2024-08-07
1 search

To design a good iPadOS keyboard input accessory view, you can follow these guidelines based on the content from the WWDC sessions:
-
Use Input Accessory View: This view docks above the keyboard and handles the case when a hardware keyboard is used by docking the view at the bottom of the screen. This ensures that your accessory view is always accessible regardless of the keyboard type being used.
- Example: If you need to place a view directly above the keyboard, using an input accessory view is recommended. This approach is demonstrated in the session Build multilingual-ready apps.
-
Keyboard Layout Guide: If you want to customize the placement of views in relation to the keyboard, using the keyboard layout guide can be very helpful. This allows for more flexibility in positioning your views.
-
Handling Marked Text: When dealing with languages like Chinese or Japanese, the keyboard uses marked text, which is temporary text before a suggestion is chosen. Ensure that your app checks for marked text before modifying the text to avoid interrupting the typing process.
- Example: The session Build multilingual-ready apps discusses how to handle marked text properly to provide inline completions without disrupting the user’s typing.
-
Feedback Generators: For apps that involve drawing or other interactive elements, consider using feedback generators to provide haptic feedback. This can enhance the user experience, especially when using Apple Pencil.
- Example: The session What’s new in UIKit covers how to integrate drawing experiences with Apple Pencil Pro and provide a rich tool-picking experience with less code.
By following these guidelines, you can create a well-designed keyboard input accessory view that enhances the user experience on iPadOS.
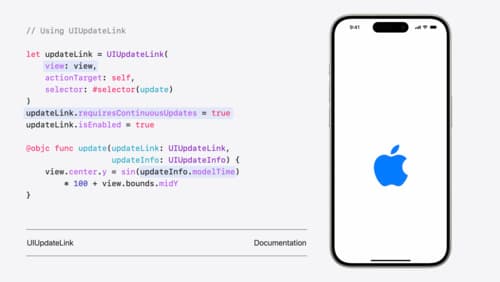
What’s new in UIKit
Explore everything new in UIKit, including tab and document launch experiences, transitions, and text and input changes. We’ll also discuss better-than-ever interoperability between UIKit and SwiftUI animations and gestures, as well as general improvements throughout UIKit.
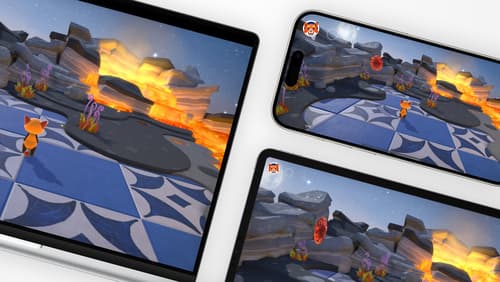
Design advanced games for Apple platforms
Learn how to adapt your high-end game so it feels at home on Mac, iPad, and iPhone. We’ll go over how to make your game look stunning on different displays, tailor your input and controls to be intuitive on each device, and take advantage of Apple technologies that deliver great player experiences.
Extend your app’s controls across the system
Bring your app’s controls to Control Center, the Lock Screen, and beyond. Learn how you can use WidgetKit to extend your app’s controls to the system experience. We’ll cover how you can to build a control, tailor its appearance, and make it configurable.