How do you build a widget?
Asked on 2024-07-17
1 search

To build a widget, you can follow these general steps, which are highlighted in various sessions from WWDC 2024:
-
Define the Widget:
- You need a widget definition, which includes the view and timeline provider. This is done using WidgetKit.
- For more details on the view and timeline provider, refer to the WidgetKit documentation.
-
Create a Configurable Widget:
- If you want your widget to be configurable, you need to define a configuration intent. This intent should conform to
WidgetConfigurationIntent. - You can add parameters to your configuration intent to make the widget configurable. For example, you can add a parameter to select which trail to show in a trail conditions widget.
- Example:
struct TrailConditionsWidget: Widget {
    var body: some WidgetConfiguration {
        IntentConfiguration(kind: "TrailConditionsWidget", intent: TrailConfigurationIntent.self, provider: TrailProvider()) { entry in
            TrailConditionsWidgetEntryView(entry: entry)
        }
        .configurationDisplayName("Trail Conditions")
        .description("Shows the conditions of a selected trail.")
    }
}
- If you want your widget to be configurable, you need to define a configuration intent. This intent should conform to
-
Interactive Widgets:
- You can create interactive widgets that allow users to perform actions directly from the widget without opening the app. This is done using buttons and toggles.
- Example:
struct InteractiveWidget: Widget {
    var body: some WidgetConfiguration {
        StaticConfiguration(kind: "InteractiveWidget", provider: Provider()) { entry in
            InteractiveWidgetEntryView(entry: entry)
        }
        .configurationDisplayName("Interactive Widget")
        .description("A widget with interactive elements.")
    }
}
-
Use App Intents:
- Widgets use app intents to perform actions. You need to define the app intents that your widget will use.
- Example:
struct LockDoorIntent: AppIntent {
    static var title: LocalizedStringResource = "Lock Door"
    func perform() async throws -> some IntentResult {
        // Perform the action to lock the door
    }
}
-
Add the Widget to Your App:
- Finally, you need to add the widget to your app by including it in the widget extension.
For more detailed steps and examples, you can refer to the following sessions from WWDC 2024:
- Bring your app’s core features to users with App Intents
- Extend your app’s controls across the system
- What’s new in watchOS 11
These sessions provide comprehensive guidance on building widgets, making them interactive, and integrating them with app intents.
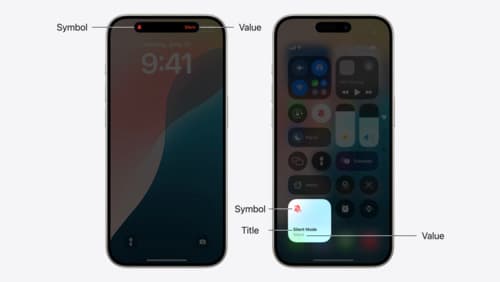
Extend your app’s controls across the system
Bring your app’s controls to Control Center, the Lock Screen, and beyond. Learn how you can use WidgetKit to extend your app’s controls to the system experience. We’ll cover how you can to build a control, tailor its appearance, and make it configurable.
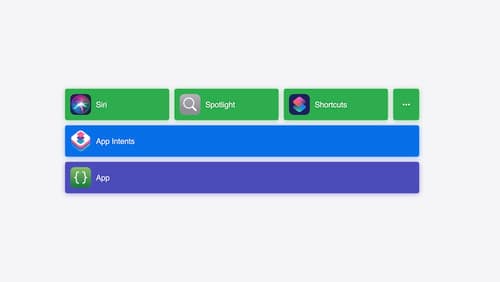
Bring your app’s core features to users with App Intents
Learn the principles of the App Intents framework, like intents, entities, and queries, and how you can harness them to expose your app’s most important functionality right where people need it most. Find out how to build deep integration between your app and the many system features built on top of App Intents, including Siri, controls and widgets, Apple Pencil, Shortcuts, the Action button, and more. Get tips on how to build your App Intents integrations efficiently to create the best experiences in every surface while still sharing code and core functionality.
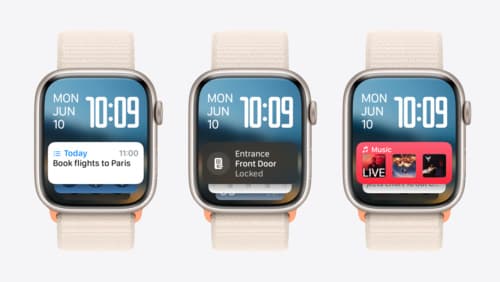
What’s new in watchOS 11
Explore new opportunities on Apple Watch, including bringing Double Tap support to your watchOS app, making your Smart Stack widgets even more relevant and interactive, and displaying your iOS Live Activities in the Smart Stack.