Customize your app for Assistive Access
Asked on 2025-07-01
2 searches

To customize your app for Assistive Access, you should follow several key steps and principles as outlined in the session "Customize your app for Assistive Access" from WWDC 2025.
-
Set Up Your App: Begin by setting the
UI supports Assistive AccessInfo Plist key to true in your app bundle. This ensures your app is listed under Optimized Apps in Assistive Access settings and launches in full screen. -
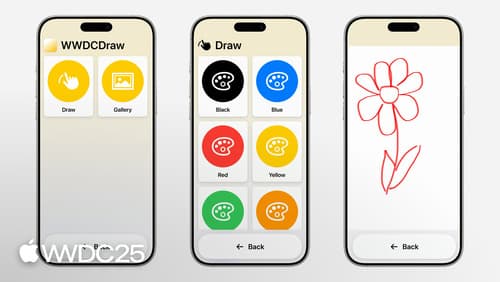
Create an Assistive Access Scene: Use the Assistive Access scene to create a streamlined app experience. This involves designing a new content view with a custom hierarchy tailored for Assistive Access. The scene will display native SwiftUI controls in a more prominent style, adhering to a grid or row layout configured in Assistive Access settings.
-
Focus on Core Features: Identify the core functionality of your app and bring only the most essential features to Assistive Access. This helps reduce cognitive load by minimizing distractions and focusing on the most important tasks.
-
Design for Clarity and Simplicity: Ensure controls are clearly visible and avoid hidden gestures or nested UI. Use prominent controls and avoid timed interactions to allow users to complete tasks at their own pace.
-
Incremental Guided Flows: Design experiences that guide users through a selection process with incremental steps, avoiding lengthy setup processes.
-
Visual Alternatives: Provide visual alternatives to text, such as icons alongside navigation titles, to make the app more intuitive for users with cognitive disabilities.
For more detailed guidance, you can refer to the session Customize your app for Assistive Access (04:09) which covers creating a scene, and Tailor your app (07:08) for further customization tips.
Customize your app for Assistive Access
Assistive Access is a distinctive, focused iOS experience that makes it easier for people with cognitive disabilities to use iPhone and iPad independently. In iOS and iPadOS 26, you can customize your app when it’s running in Assistive Access to give people greater ease and independence. Learn how to tailor your app using the AssistiveAccess SwiftUI scene type, and explore the key design principles that can help you create a high-quality Assistive Access experience for everyone.

Principles of inclusive app design
Discover how understanding disability can help you create better apps for everyone. Find out how to make your apps more inclusive by supporting multiple types of interaction, providing customization, and adopting accessibility APIs.

Evaluate your app for Accessibility Nutrition Labels
Use Accessibility Nutrition Labels on your App Store product page to highlight the accessibility features supported by your app. You’ll learn how to evaluate your app’s accessibility features — such as VoiceOver, Larger Text, Captions, and more — and choose accurate and informative Accessibility Nutrition Labels. You’ll also find out how to approach accessibility throughout the design phase.