how do I apply glass effect
Asked on 2025-06-11
1 search

To apply the glass effect in your app, you can follow different approaches depending on the framework you are using. Here are some guidelines based on the sessions from WWDC 2025:
SwiftUI
In SwiftUI, you can use the Glass Effect ID modifier to apply the glass effect. You need to declare a local namespace and associate it with each of the glass effect elements. This allows for smooth transitions and interactions. You can see an example of this in the session Build a SwiftUI app with the new design.
UIKit
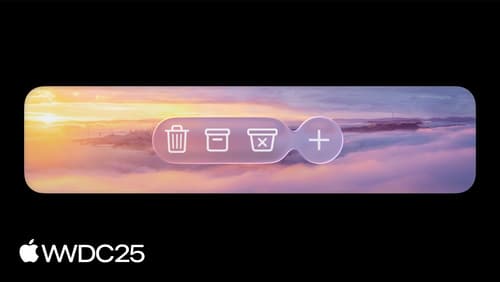
For UIKit, you can create a UI Visual Effect view and configure it with the glass effect. You can customize the shape using the corner configuration API and adapt the appearance based on the user interface style. To manage multiple glass elements, use the UI Glass Container Effect to control their interaction and appearance. More details can be found in the session Build a UIKit app with the new design.
AppKit
In AppKit, you can use the NSGlassEffectView to apply the glass effect. Set the content view property to the desired view and use auto layout to maintain geometry. For multiple glass elements, use the NS Glass Effect Container View to group them and ensure a consistent appearance. This is discussed in the session Build an AppKit app with the new design.
General Principles
The Liquid Glass material is designed to float above your content, providing a distinct control layer. It adapts to its surroundings, switching between light and dark modes to maintain contrast and legibility. Avoid stacking glass elements on top of each other to prevent a cluttered interface. For more insights, refer to the session Meet Liquid Glass.
These sessions provide comprehensive guidance on implementing the glass effect across different Apple platforms.

Build a SwiftUI app with the new design
Explore the ways Liquid Glass transforms the look and feel of your app. Discover how this stunning new material enhances toolbars, controls, and app structures across platforms, providing delightful interactions and seamlessly integrating your app with the system. Learn how to adopt new APIs that can help you make the most of Liquid Glass.
Build a UIKit app with the new design
Update your UIKit app to take full advantage of the new design system. We’ll dive into key changes to tab views, split views, bars, presentations, search, and controls, and show you how to use Liquid Glass in your custom UI. To get the most out of this video, we recommend first watching “Get to know the new design system” for general design guidance.
Build an AppKit app with the new design
Update your AppKit app to take full advantage of the new design system. We’ll dive into key changes to tab views, split views, bars, presentations, search, and controls, and show you how to use Liquid Glass in your custom UI. To get the most out of this video, we recommend first watching “Get to know the new design system” for general design guidance.