how to use Camera Control to capture in app
Asked on 2025-06-16
1 search

To use Camera Control to capture in your app, you can follow these steps as outlined in the session "Enhancing your camera experience with capture controls" from WWDC 2025:
-
Set Up AVCapture Session: Begin by creating a capture device and adding it to an AVCapture session as an input. This is the foundational step for configuring your camera capture setup.
-
Add System-Defined Controls: Create system-defined controls with a reference to the capture device. These controls will automatically manage properties like video zoom factor or exposure target bias.
-
Implement App-Defined Controls: If you have specific behaviors you want to implement, create app-defined controls with action callbacks. These callbacks can be run on a queue you specify, allowing you to manage capture settings synchronously.
-
Integrate Camera Control: Add the controls to your session. Camera Control can be used as a shutter button, and it supports gestures like light pressing for preview and adjustments. You can also configure it to handle zooming in and out.
-
Update UI with KVO or Action Handlers: Use Key Value Observing (KVO) to update your UI when properties change, or create system controls with action handlers to update the UI directly on the main thread.
For more detailed guidance, you can refer to the session Enhancing your camera experience with capture controls (10:00) which covers the use of Camera Control in depth.
Enhancing your camera experience with capture controls
Learn how to customize capture controls in your camera experiences. We’ll show you how to take photos with all physical capture controls, including new AirPods support, and how to adjust settings with Camera Control.
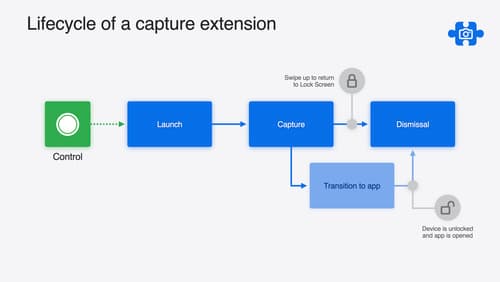
Build a great Lock Screen camera capture experience
Find out how the LockedCameraCapture API can help you bring your capture application’s most useful information directly to the Lock Screen. Examine the API’s features and functionality, learn how to get started creating a capture extension, and find out how that extension behaves when the device is locked.